Garden Help Desk: How can I treat my sick pear tree?

Courtesy photo
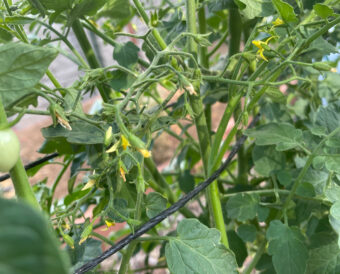
Blister mite feeding inside pear leaves causes spots on the leaves. By mid-summer these spots will be dark brown.
I have a sick pear tree (not sure which kind of pear tree) that I was hoping you could teach me how to treat. The leaves (particularly in the new growth at the top of the tree) are curling, bubbling and brown-spotting.
This looks like Pearleaf blister mite damage. The mites are protected inside the leaves at this point, so there is nothing that needs to be done until shortly before the leaves begin to drop this fall, when you’ll apply a treatment to prevent the same problem next year.
We talked about Pearleaf blister mites in one of our May 2020 columns, but here is a quick review of the basics.
- Blister mites overwinter under leaf bud scales on your tree, migrate onto emerging leaves in the spring and will feed inside leaves until the fall. They are protected from sprays while inside the leaves.
- When the temperatures cool in the fall, the mites will leave the blisters and travel back onto the tree to shelter under the leaf bud scales again.
- Trees can tolerate low populations of blister mites, but severe infestations can reduce the vigor of your tree and may justify treating to prevent the problem next year.
- Spray your tree after you’ve harvested your pears this fall but before the leaves begin drop. One application of horticultural oil, carbaryl or sulfur should be applied. You can combine horticultural oil and carbaryl, but do not combine oil and sulfur.
- Adding a well-timed dormant oil spray in the spring can also help to reduce the mite population.
- Pear and apple leaves with blister mite damage will drop earlier than healthy leaves, so don’t be alarmed if that happens.
I divided and replanted part of my bearded iris a couple of months ago, but they aren’t growing. I want to divide the rest of my irises, but I don’t want to make the same mistake if I did something wrong in April.
Plantings of bearded iris, also called German iris, need to be divided every 2-5 years. Bearded iris grows from fleshy rhizomes (underground stems), and new offshoots develop from the rhizomes each year. Without regular divisions, iris beds become crowded with offshoots and flowering declines.

Courtesy photo
Blister mite damage early in the season will look bumpy and light green, but over the season the blisters will darken.
Irises that are divided early in the spring before flowering won’t do well for the first year after division. The best time to divide iris clumps is after they’re done flowering. At that time, you should cut the foliage back about halfway to make the clumps easier to handle and to reduce transplant stress for the irises.
To divide your iris plantings, use a shovel or spading fork to dig up entire clumps. Gently shake, brush, or wash off any soil. Break apart clumps of rhizomes into smaller clumps or into individual rhizomes. If you need to use a knife or pruners, sanitize the tool before starting.
Examine the rhizomes carefully. Discard any that are old, diseased, damaged, mushy or bad smelling. Only keep and replant the youngest, “freshest,” and best rhizomes. Each rhizome piece that you replant must have at least one growing point (fan of foliage).
If your iris bed has gotten shady over the past few years, you’ll want to relocate your irises to a sunnier spot with good drainage; irises need at least six hours of sunshine per day to be at their best. And before you replant the rhizomes you’re keeping, take the time to improve the soil with plant-based compost. The soil in your iris bed has been undisturbed for several years and this is you only chance to improve the soil for another few years.
Now that you’ve separated out the best small clumps or individual rhizomes and worked some compost into the soil, you’re ready to replant. If you’re replanting individual rhizomes, replant them in groups of three with at least 12 inches of space between the groups. If you’re replanting small clumps of rhizomes, space the clumps about 15-18 inches apart. Your iris bed will be more pleasing to the eye if you place all the clumps or individual rhizomes so that their flat leaves are all oriented in the same direction.
Place your iris rhizomes so that the tops will be just above the soil line if your soil is a little clay like. If you’re working with a sandier soil, position the rhizomes and inch or two below the soil line. Once you’re done, water the area well. A twice a week watering after that should take your newly replanted irises through their first summer without any drought stress. By next year, they’ll do fine with a deep soak every 5-7 days.
-

- Blister mite feeding inside pear leaves causes spots on the leaves. By mid-summer these spots will be dark brown.
-

- Blister mite damage early in the season will look bumpy and light green, but over the season the blisters will darken.